This post demonstrates how to set up and deploy a static Angular app to Azure Blob Storage. We will use a package called ng-deploy–azure to automate the deployment. The starter Angular app will be connected to a back-end API, and the Leaflet library will be used to visualize the data on a map.
Prerequisites
You will need these installed before we begin:
- Node.js (12.16.2 in this tutorial)
- Angular CLI (10.0.7 in this tutorial)
- Azure Account
- Azure Storage Account
Create an Example Angular App
Follow the basic instructions to generate an app with the angular cli:
ng new example-angular-app
When prompted if you want routing, choose yes.
This process generates all of the boilerplate needed for a relatively production-ready angular site.
Generating a Data Service With Angular CLI
To start, let’s create some mock GeoJSON data to represent the result of our API call:
export const DATA = {
  "type":"FeatureCollection","features":
  [
    {
      "type":"Feature",
      "id":"48",
      "properties":
        {
          "name":"Texas",
          "density":98.07
        },
      "geometry":
        {
          "type":"Polygon",
          "coordinates": [[
              [-103.0517578125,31.98944183792288],[-106.61132812499999,31.98944183792288],
              [-106.5673828125,31.765537409484374],[-104.69970703125,30.278044377800153],
              [-104.21630859375,29.439597566602902],[-103.07373046875,28.9600886880068],
              [-102.7001953125,29.783449456820605],[-101.40380859375,29.783449456820605],
              [-99.51416015625,27.605670826465445],[-99.052734375,26.41155054662258],
              [-97.119140625,25.997549919572112],[-97.3828125,27.15692045688088],
              [-96.85546875,28.188243641850313],[-93.8671875,29.726222319395504],
              [-93.55957031249999,31.071755902820133],[-94.02099609375,31.98944183792288],
              [-94.04296874999999,33.578014746143985],[-96.6796875,33.8339199536547],
              [-99.97558593749999,34.57895241036948],[-99.99755859375,36.474306755095235],
              [-103.0517578125,36.474306755095235],[-103.0517578125,31.98944183792288]]]
        }
    },
  ]
}
We will use angular cli to scaffold a data service to communicate with our back-end
ng generate service data
Two files will be created in the src/app/ directory: data.service.spec.ts and data.service.ts.
Update data.service.ts to return an Observable of our mock data:
import { Injectable } from '@angular/core';
import { Observable, of } from 'rxjs';
import { DATA } from './mock-data';

@Injectable({
  providedIn: 'root'
})
export class DataService {

  constructor() { }

  getData(): Observable<Object> {
    return of(DATA);
  }
}
Make sure to update app.module.ts to register our new data service as a provider:
@NgModule({
  declarations: [
    AppComponent,
    MainComponent
  ],
  imports: [
    BrowserModule,
    AppRoutingModule
  ],
  providers: [DataService],
  bootstrap: [AppComponent]
})
export class AppModule { }
Generate a Component to Visualize the Data
ng generate component main
The CLI generates a bunch of new files:

Inject our newly created data service into our new component’s constructor and add a stub subscription to it:
import { Component, OnInit } from '@angular/core';
import { DataService } from '../data.service';

@Component({
  selector: 'app-main',
  templateUrl: './main.component.html',
  styleUrls: ['./main.component.css']
})
export class MainComponent implements OnInit {

  constructor(private dataService: DataService) {
  }

  ngOnInit(){
    this.dataService.getData().subscribe(data => {
      console.log("Data from service and in scope within main component: ", data);
    });
  }
}
Update app-routing.module.ts with a new route to point to our main component:
import { NgModule } from '@angular/core';
import { Routes, RouterModule } from '@angular/router';
import { MainComponent } from './main/main.component';

const routes: Routes = [
  {path: '', component: MainComponent}
];

@NgModule({
  imports: [RouterModule.forRoot(routes)],
  exports: [RouterModule]
})
export class AppRoutingModule { }
Build and run the app, testing that our print statements from the MainComponent are returning the data from our data-service:
ng serve

Hooking up Leaflet to Visualize the Data
We will use my favorite open-source library for map stuff called Leaflet. I normally start the process of integrating a new angular component by searching for an example on Stackblitz. Here is a good example of that for Leaflet.
Here are the steps to integrate a simple leaflet display in our app:
Install Leaflet
npm install leaflet
npm install @asymmetrik/ngx-leaflet
npm install --save-dev @types/leaflet
Update your app.module.ts to hook-up our two new modules
import { BrowserModule } from '@angular/platform-browser';
import { NgModule } from '@angular/core';

import { LeafletModule } from '@asymmetrik/ngx-leaflet';

import { AppRoutingModule } from './app-routing.module';
import { AppComponent } from './app.component';
import { DataService } from './data.service';
import { MainComponent } from './main/main.component';

@NgModule({
  declarations: [
    AppComponent,
    MainComponent
  ],
  imports: [
    BrowserModule,
    AppRoutingModule,
    LeafletModule.forRoot()
  ],
  providers: [DataService],
  bootstrap: [AppComponent]
})
export class AppModule { }
And add Leaflet’s CSS to our global styles defined in src/styles.css
/* You can add global styles to this file, and also import other style files */
@import "~leaflet/dist/leaflet.css";
/* You can add global styles to this file, and also import other style files */
@import "~leaflet/dist/leaflet.css";
And add some CSS to our main component to define the map style in main.component.css:
#leaflet {
    height: 100%;
    width: 100%;
    position: absolute;
    top: 0;
    left: 0;
}
With Leaflet integrated into our app, let’s add the appropriate imports and variables to the top of our MainComponent to hold the map state and config:
import { Component, OnInit } from '@angular/core';
import * as L from 'leaflet';
import { DataService } from '../data.service';

@Component({
  selector: 'app-main',
  templateUrl: './main.component.html',
  styleUrls: ['./main.component.css']
})
export class MainComponent implements OnInit {

  // leaflet map's state and config
  map;
  options = {
    layers: [L.tileLayer('https://{s}.tile.openstreetmap.org/{z}/{x}/{y}.png')],
    zoom: 6,
    center: L.latLng(31.392185,-99.170506)
  };
Add our map component to the template for MainComponent (main.component.html):
<div id="leaflet"
leaflet
[leafletOptions]="options"
(leafletMapReady)="onMapReady($event)">
</div>
Add an implementation of onMapReady() to initialize the map when it has loaded. We will use this hook to request our data from our data service, which will in turn invoke a new onDataLoaded() function.
onMapReady() implementation:
  // called when the Leaflet map is loaded
  onMapReady(map){

    //create the map
    this.map = map;

    console.log("Map Ready!");
    this.dataService.getData().subscribe(data => {this.onDataLoaded(data)})
  }
onDataLoaded() implementation:
  // called when the data has been loaded
  onDataLoaded(data){
    this.feature = L.geoJSON(data, {
      style: {weight: 1, color: 'blue', fillOpacity: 0.5},
    }).addTo(this.map);
  }
Leaflet should be ready to test out. Run the development server and look in the browser:
ng serve

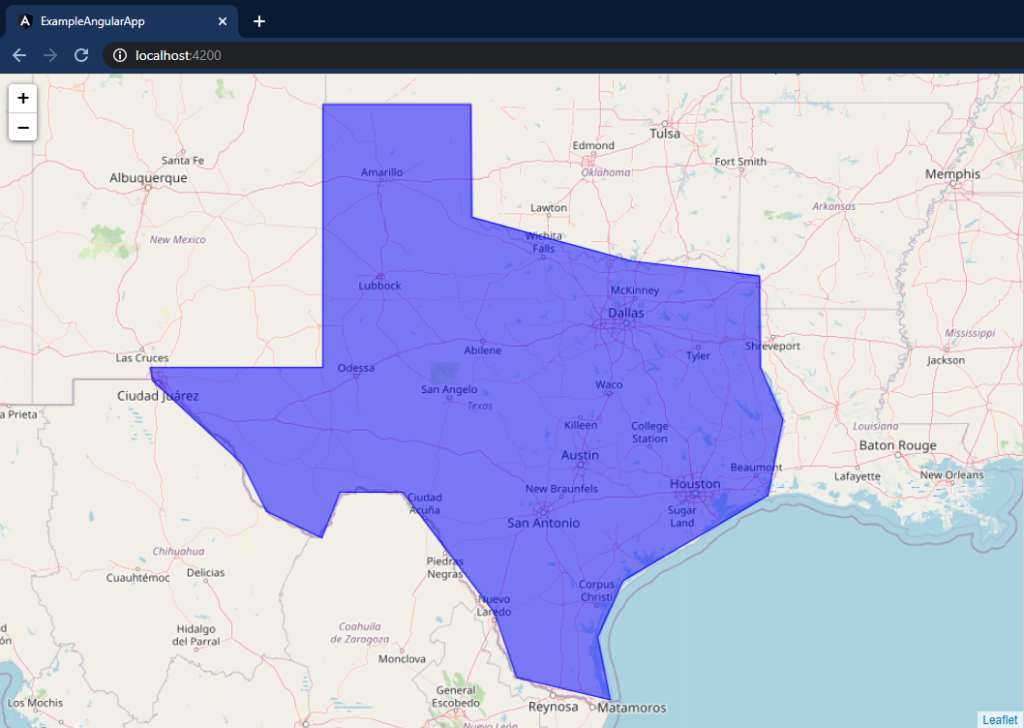
If you’re seeing the great state of Texas, everything is working!
Hooking Up a Production Data Service
We are now ready to hook this thing up to a real geoJSON data-service!
I have made another post describing the steps to set up a Basic Node.js Data Service on Azure. I have deployed an example service following that tutorial which serves geojson for all states in the USA.
We need to do a few more things to retrieve data from this service and display it on our leaflet map.
First, we need to set the development environment to point to localhost:8080:
environment.ts
export const environment = {
  production: false,
  geojson_service_url: "https://localhost:8080"
};
To communicate with a back-end data-service, we need to utilize HttpClientModule, which must be added to our app.module.ts:
...
 imports: [
    BrowserModule,
    HttpClientModule,
    AppRoutingModule,
    LeafletModule.forRoot()
  ]
...
Next, update src/app/data.service.ts to inject HttpClient and use it to make a request to our data service:
import { Injectable } from '@angular/core';
import { Observable } from 'rxjs';
import { HttpClient } from '@angular/common/http';
import { environment } from 'src/environments/environment';

@Injectable({
  providedIn: 'root'
})
export class DataService {

  constructor(
    private http: HttpClient
  ) { }

  getData(): Observable<Object> {
    return this.http.get<Object>(environment.geojson_service_url + "/states/");
  }
}
Running everything locally for development (Optional):
In a previous post, we built an example data service to serve the US States in GeoJson format. We will build this project from its Github repository:
git clone https://github.com/PaulFenton/example-data-service.git
cd example-data-service
npm install
npm run dev
With the back-end running locally in development mode, we can navigate back to our angular app and start our Angular development server:
ng serve
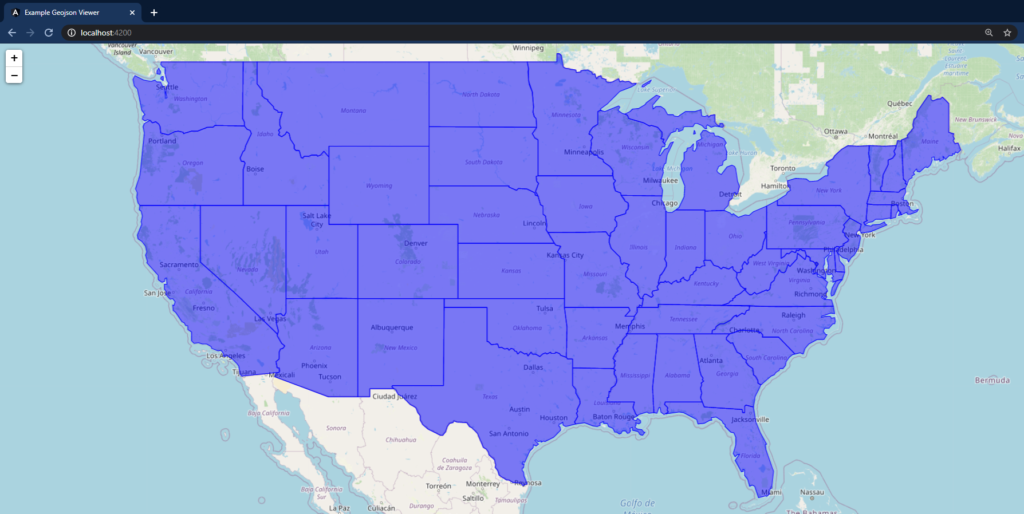
Navigating to /localhost:4200 on our browser:

Deploy our App to Azure
To run the back-end on Azure, follow the steps outlined in my previous post. Otherwise, you can use the endpoint I created until it is shut down. To connect to the production endpoint, add the following environment file called environment.prod.ts:
export const environment = {
  production: true,
  geojson_service_url: "https://example-data-service.azurewebsites.net"
};
The configurations inside angular.json at the root of your project will tell angular to use this environment file for the production build and deployment.
Utilizing the ng-deploy-azure Package
We will use an open-sourced package backed by Microsoft called ng-deploy-azure to do the heavy lifting of using the azure cli to provision storage and configure it for static hosting. Before you start you will need an azure account.
Run the following steps from their Quick-start:
ng add @azure/ng-deploy
If prompted, authenticate into Azure with the link & code provided in the output.
ng run example-angular-app:deploy

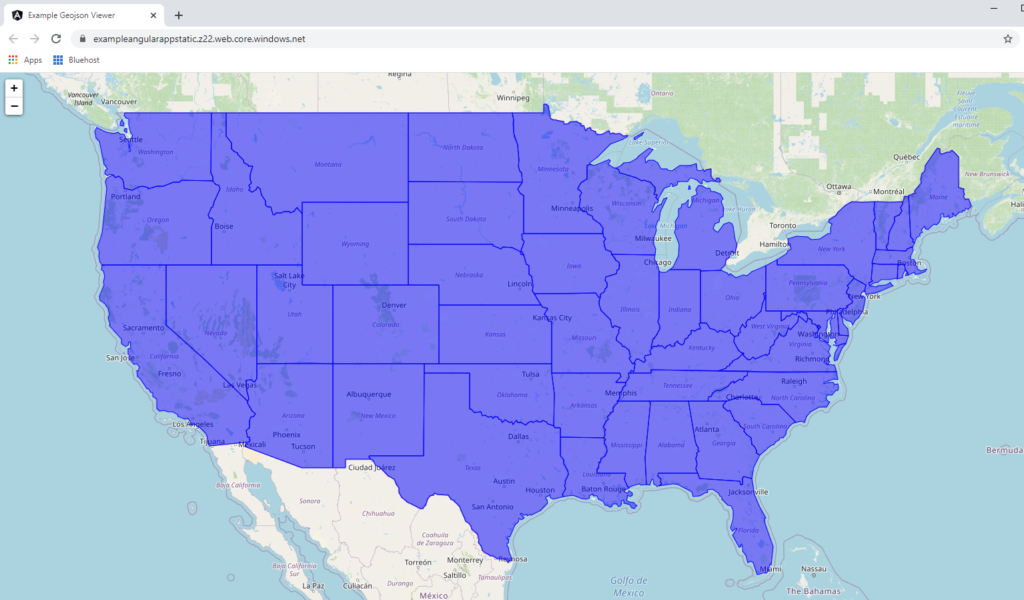
Click the link and there we have it:

You can see the version I deployed here.
You can find the code for the finished product here on Github.
This concludes the starter tutorial for angular. We can use this project as a building block in future tutorials!

