This post demonstrates how to set up and deploy a basic Node.js data service, and deploy it to an Azure instance using the Azure App Service extension for VSCode.
Prerequisites
Get these before you start:
- Node.js: https://nodejs.org/en/ (This tutorial is based on version 12.16.2)
- Visual Studio Code: https://code.visualstudio.com/
Creating a Basic Express / Node.js Project
We can start with instructions similar to the hello-world project from the express website: https://expressjs.com/en/starter/hello-world.html
Create a folder for your project, e.g. data_service/, and cd into it. Use npm to initialize a node project:
npm init
When prompted, set the package name (e.g. express-data-service), author, and accept defaults for the remaining options. We will leave the defaults, and a “start” script for the app. The result should be the following package.json file:
{
  "name": "express-data-service",
  "version": "1.0.0",
  "description": "",
  "main": "index.js",
  "scripts": {
    "start": "node index.js",
  },
  "author": "Paul Fenton",
  "license": "ISC"
}
Next, create a new index.js file with the following contents, referencing the Express library which we are about to install:
const express = require('express')
const app = express()
const port = 8080  // 8080 required for Azure monitoring

app.get('/', (req, res) => res.send('Hello World for GeoJSON Data!'));

app.listen(port, () => console.log(`Example data service started!`));
This defines an express app and defines a stub request handler for the route “/”. Express is configured to listen for requests on port 8080.
Our initial code is complete, let’s install express and get things running:
npm install express --save
Test the app, you should see a message ‘Example app listening at http://localhost:8080’.
npm start
Opening a browser, you should see our hello message when navigating to localhost:8080.

Adding a Route to Serve Some Data
We will put an example data-file in the root of our project. We will use a geojson file which represents the american state boundaries. For the purposes of this example, you can use any JSON data.
Here is what the data we have looks like:
{"type":"FeatureCollection","features":[
    {
        "type":"Feature",
        "id":"48",
        "properties":
            {
                "name": "Texas",
                "density": 98.07
            },
        "geometry":
            {
                "type":"Polygon",
                "coordinates":[[[-101.81,36.50], ... ]]
            }
    }
    ...
]}
With our data added to the project directory, we can modify our express app to read-in our JSON file when it starts, and then serve that file via a defined route.
Here is the updated index.js:
const express = require('express')
var fs = require('fs');
const app = express()
const port = 8080  // 8080 required for Azure monitoring

// read static .json file into memory for the lifetime of the app
var states = JSON.parse(fs.readFileSync('./states.json', 'utf8'));

app.get('/', (req, res) => res.send('Hello World for GeoJSON Data!'));

//serve the states GeoJson
app.get('/states', (req, res) => {
    console.log("Processing /states request.");
    res.send(states);
});

app.listen(port, () => console.log(`Example data service started!`))
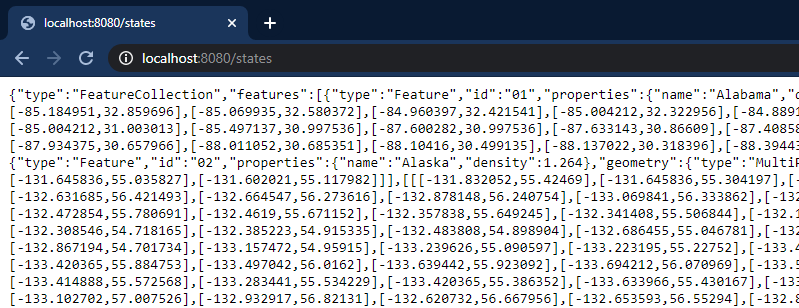
Run the app locally and test it in the browser:
npm start
Configuring CORS
We now configure the Cross Origin Resource Sharing (CORS) to allow our service to talk to angular sites. This is handled by adding the ‘cors’ library:
npm install cors --save
Update the index.js to utilize cors:
const express = require('express')
const cors = require('cors');
var fs = require('fs');
const app = express()
const port = 8080  // 8080 required for Azure monitoring

// allow cross origin requests
app.use(cors());
app.options('*', cors());

...
That’s it for our example data service app! The working example-data-service codebase is available here on Github. In the next step, we will deploy this service to the cloud!
Setting up Azure
To allow users and websites to see our service, we need to deploy it to the cloud. Let’s set up the tools we need to do this:
- sign up for an account and subscription, on the Azure website / console.
- install the Azure App Service extension on VSCode. Search for the plugin and install it:

Deploying to Azure
With our Azure account and VSCode extension installed, click on the Azure icon on the side-menu, and click “Sign in to Azure…”. This will redirect you to the web-based authentication where you can use the Azure account you created earlier. Once complete, you should see the subscription you created:

We can now follow the remaining steps from the Azure App Service installation documentation:

Choose Create New App, and follow the prompts
- Type a unique name, e.g. “example-data-service”
- Select “Linux” for OS
- Select the version of node you are using (e.g. “Node 12 LTS” for this tutorial)
You should see your new app in the explorer. Right click on it and select “Deploy to Web App…”:
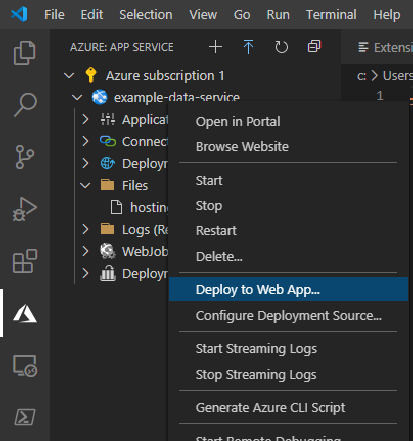
VSCode will prompt you to “Select the folder to zip and deploy”. Your current directory should be the root of your new data service project, in which case you can choose the top selection, otherwise click “Browse..” to find the folder you put the project files in.
Click “Yes” to run build commands on the target server, and if prompted, click “Deploy” to overwrite any previous deployments to this app:

When complete, you should receive a popup notification, and be able to see logs from Azure App Service:

Test your new data service by clicking “Browse Website”. Within a few minutes you should be able to see the results from the “Hello World” route (“/”):

Test that our new “/states” route is returning the .json we added

Enabling “Always On” (Optional)
By default, this app will be shut down automatically after 20 minutes of inactivity. We can turn off this behavior by setting the “Always On” option.
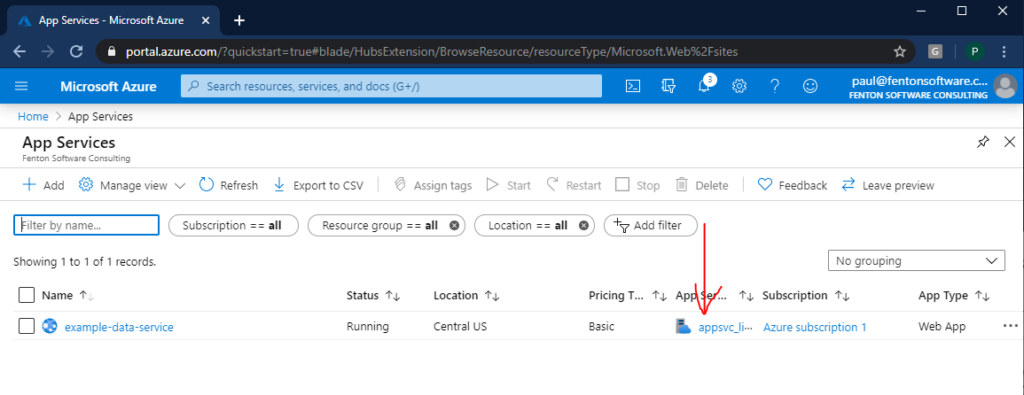
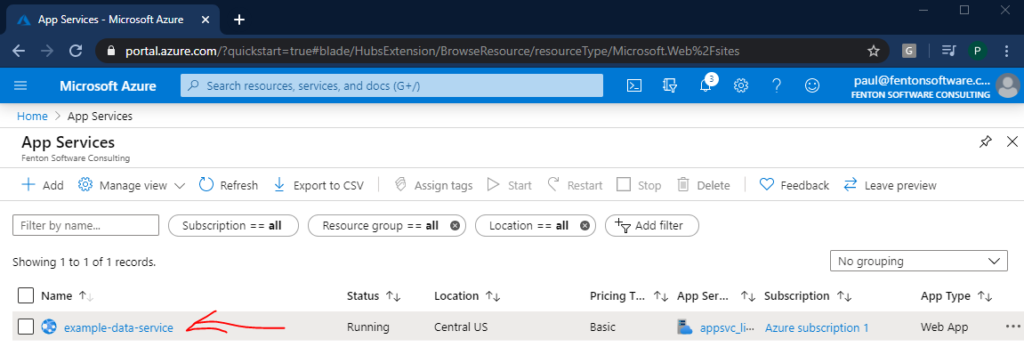
As of the writing of this post, you need to choose one of the paid App Service Plans to enable this feature. You can configure the service plan that was automatically created by navigating to the Azure Portal, clicking App Services, and selecting the

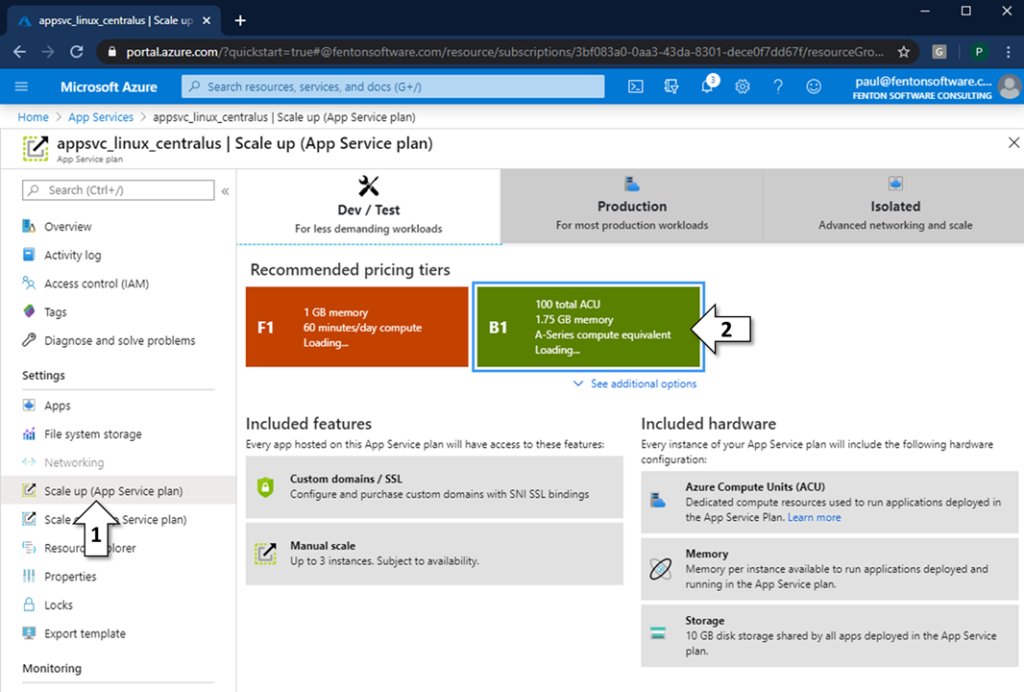
Click “Scale Up”, select at least the Development B1 plan, or one of the production plans. Click “Apply” at the bottom.
Select your app in the App Services Portal:
Go to Configuration, General Settings, and set the “Always on” option to “On”. Click “Save”:

Tutorial Complete!
We’re done! Here is the example service running. You are now ready to use this data service or your own as a building block for bigger and better things.

